Change a WordPress slug with Redirection, Rank Math, or Yoast Premium, then verify redirects, internal links, canonical URLs, and your sitemap.
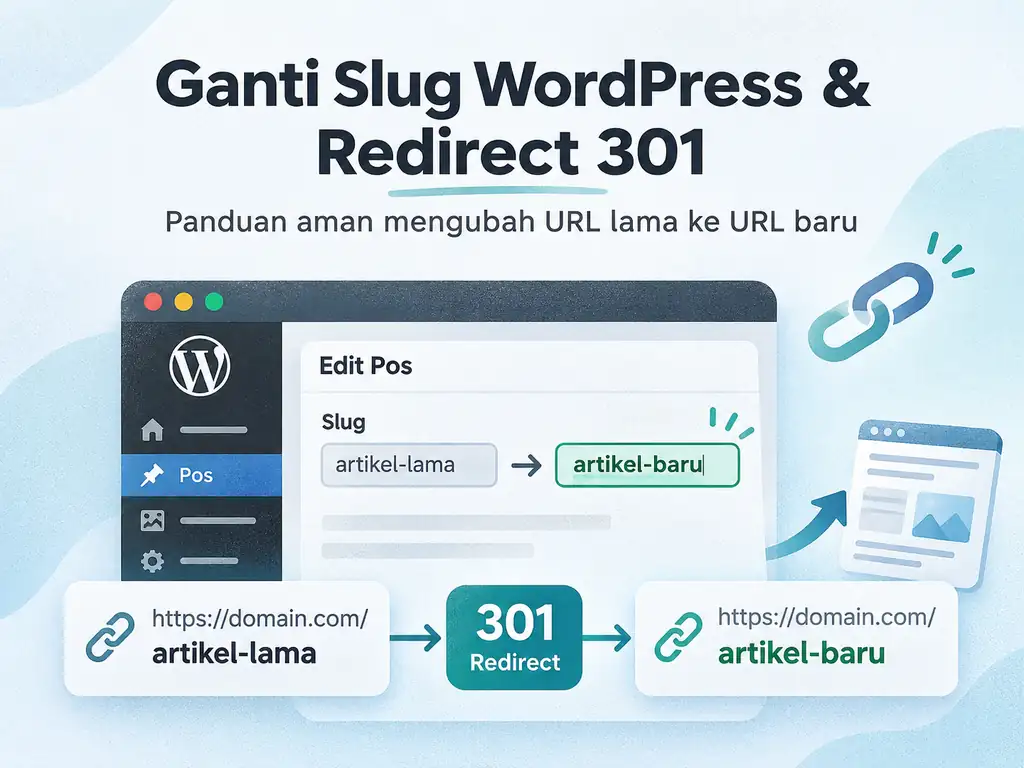
To change a WordPress slug and set up a 301 redirect, update the slug in the editor, then permanently redirect the old URL to the new one. WordPress lets you edit the slug without an additional plugin; you can manage the redirect with Redirection, Rank Math, or Yoast SEO Premium. Finally, check the old URL's HTTP response and confirm that the correct destination page loads.
The slug has changed, but what happens to existing links?
Changing a few words in a post's address looks straightforward. However, the previous URL may still appear in your navigation, other articles, customer messages, or links from other websites.
The job is not finished just because the new URL opens successfully. You also need to check what happens when someone visits the old address.
The expected result is simple:
Old URL -> 301 -> New URL -> 200 OK
Visitors should reach the correct content. They should not be sent to an unrelated homepage, passed through unnecessary redirects, or left on a page that cannot be found.
Understand slugs, permalinks, and redirects
In the following example, business-website-guide is the slug, while the complete address is the permalink:
https://example.com/business-website-guide/
The WordPress permalink documentation distinguishes site-wide URL structure from the address of an individual piece of content. Changing one post's slug is not the same as changing your entire website's permalink structure.
Term
Practical meaning
Slug
The part of an address that identifies the content, such as business-website-guide.
Permalink
The complete address of a post, page, or archive.
301 redirect
An HTTP response indicating that an address has moved permanently.
Destination URL
The new address that receives visitors from the old URL.
Google Search Central recommends permanent server-side redirects for URL changes that are intended to last. A redirect implemented through PHP in a CMS is also server-side; you do not necessarily need to edit your hosting configuration directly.
Do not change Settings > Permalinks just to update one slug. The WordPress permalink settings control broader address patterns, such as whether URLs include dates or post names.
When should you change a slug?
Consider a change when a slug contains a typo, does not describe the content, or includes information that is no longer relevant. Avoid changing it repeatedly just because you discover another keyword variation.
Choose a new slug that is understandable and accurately describes the page. Google's URL structure guidance recommends descriptive URLs and hyphens to separate words.
This guide uses the following example:
Old URL:
https://example.com/business-website-tips-2024/

New URL:
https://example.com/business-website-guide/
The example assumes that the updated guide still addresses the same underlying need. Choose a redirect destination based on the relationship between the content, not simply because another page is available.
Changing a URL is not an instant ranking improvement. Google's site-move guidance notes that site changes may involve fluctuations while pages are recrawled and reindexed.
Compare three WordPress redirect plugins
These plugins are alternatives, not a bundle to install together.
Paid; the redirect manager is not included in the free version.
Includes a redirect manager and URL-change monitoring.
Yoast users who want integrated redirect management.
The feature references come from the developers' official listings in the WordPress plugin directory. Check the current package, subscription term, price, and taxes before purchasing a paid version. This comparison is based on documented features, not a benchmark of all three plugins on one installation.
My recommendation: choose Redirection when redirect management is all you need. If Rank Math is already active, use its existing module. Consider Yoast Premium when you want to stay within Yoast's ecosystem and also need its premium features.
Do not install Rank Math alongside Yoast merely to compare their redirects on a production website. Rank Math's WordPress.org documentation warns that overlapping SEO plugins can cause conflicts. Establish one primary place to manage the redirect rule for each URL.
How to change a WordPress slug and set up a 301 redirect
Steps 2, 3, and 4 are alternative plugin setups. Follow the one that matches your chosen plugin, then continue to step 5.
1. Record the old address and prepare a recovery plan
Before editing anything, copy the complete old URL. Record the intended new slug, the reason for the change, and the date.
Item
Example value
Old URL
https://example.com/business-website-tips-2024/
New slug
business-website-guide
Intended destination URL
https://example.com/business-website-guide/
Redirect type
301
Content being edited
The same post, not a newly created duplicate.
As a practical precaution, prepare a backup and test changes to important pages on a staging site first. Also record any existing redirects configured in a plugin, at the hosting level, or through a CDN.
The source and destination must not be identical. Check whether another piece of content already uses the proposed destination so that you do not redirect visitors to the wrong page.
For changes involving many pages, prepare a URL inventory and recovery requirements before requesting technical help through the Services page. That inventory makes the scope clear without having to guess which addresses are affected.
2. Free option: configure the Redirection plugin
Install Redirection from the WordPress plugin directory and activate it. Open Tools > Redirection and complete the initial setup.
Before making subsequent slug changes, open the plugin settings and review URL Monitoring. Select the content types you want to monitor, such as posts and pages. The Redirection developer explains that the plugin can monitor permalink changes and create redirects to new addresses.
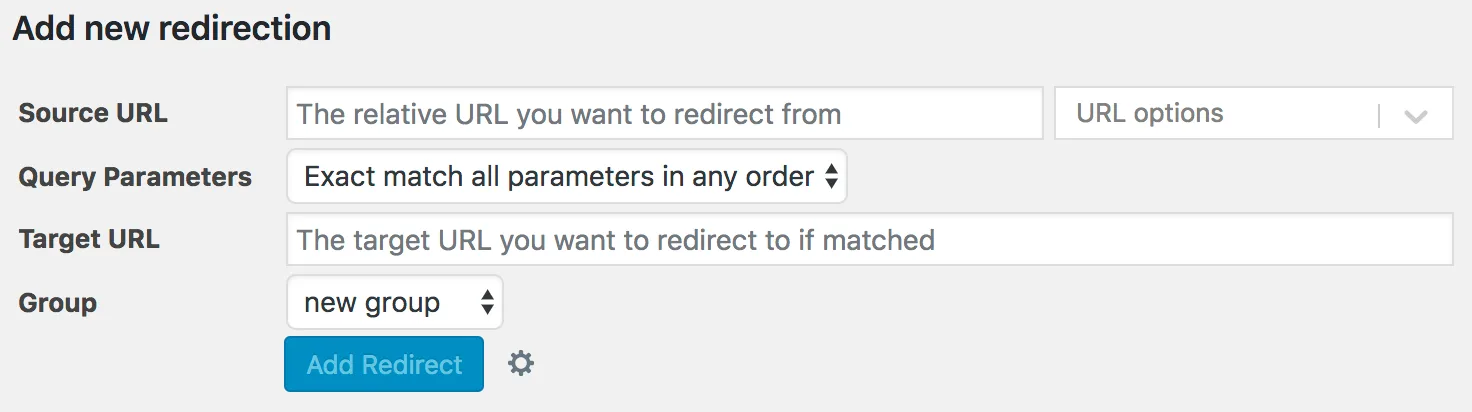
After saving the slug change, check the redirect list. If no rule has been created, add one manually with the following values:
Source URL:
/business-website-tips-2024/

Target URL:
https://example.com/business-website-guide/

HTTP code:
301

Regex:
Disabled for a normal single-URL match
Use the old path as the source and the complete new page address as the destination. If the old URL includes a directory such as /blog/, include that directory in the source path.
Activate a manual redirect only after the destination URL is available. For one slug, start with ordinary URL matching rather than a regular expression.
Also consider addresses with query parameters, such as ?ref=newsletter. Redirection provides options for matching parameters, ignoring them, or forwarding them to the destination. Choose the behavior your page needs and test those variations.
Manual redirect form in Redirection. Source: Redirection documentation.
3. Integrated option: configure redirects in Rank Math
On a website already using Rank Math, open the plugin dashboard and enable the Redirections module. If the module is not visible, check Advanced Mode.
To monitor slug changes, go to:
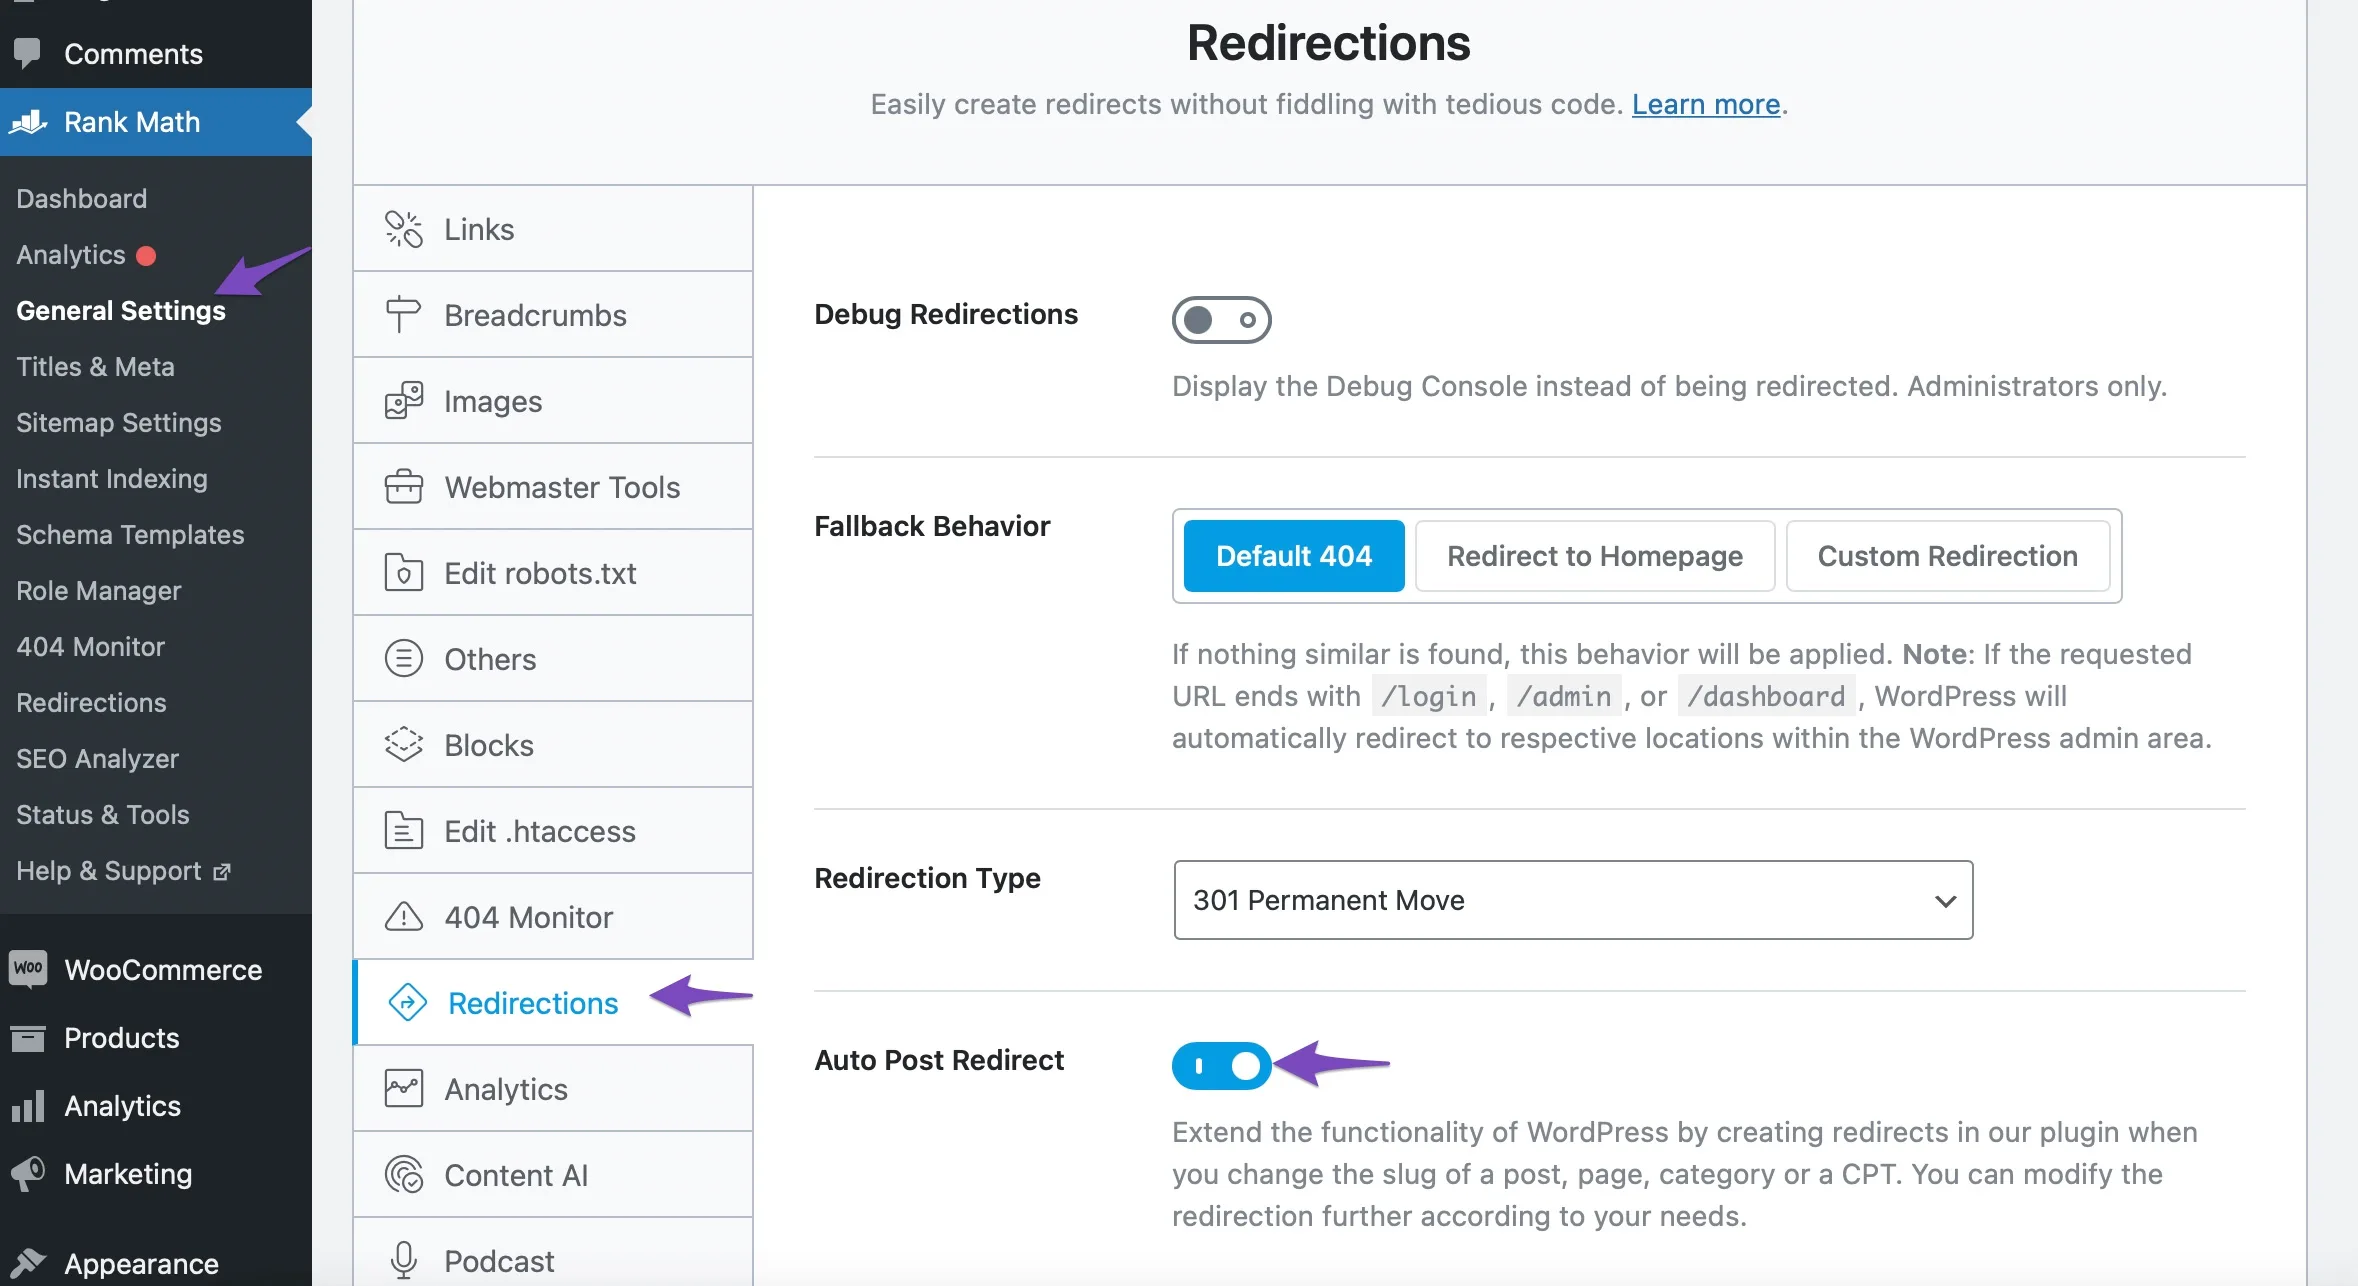
Rank Math SEO > General Settings > Redirections
Enable Auto Post Redirect and save the settings. Enable it before editing the URL and inspect the resulting rule afterward; do not assume that changes made before monitoring was enabled have already been recorded.
If you need a manual redirect after changing the slug, open Redirections and add a rule:
Setting
Value
Source URLs
/business-website-tips-2024/
Match Type
Exact
Destination URL
https://example.com/business-website-guide/
Redirection Type
301 Permanent Move
Status
Activate, after the destination is accessible.
Exact matching limits the rule to the intended address. Avoid Contains or an overly broad pattern when changing a single URL, because those options can affect a different set of addresses.
Use the existing Rank Math module before considering a paid upgrade. For a straightforward permanent redirect, you need the source, destination, 301 status, and an active rule, not advanced scheduling features.
The Auto Post Redirect setting in Rank Math. Source: Rank Math documentation.
4. Paid option: use the Yoast Premium redirect manager
Make sure you are using Yoast SEO Premium. The redirect manager described here is not part of the free Yoast SEO plugin.
After changing a slug, review the notification and any rules the plugin creates or offers to create. Do not add an identical manual rule when the correct redirect already exists.
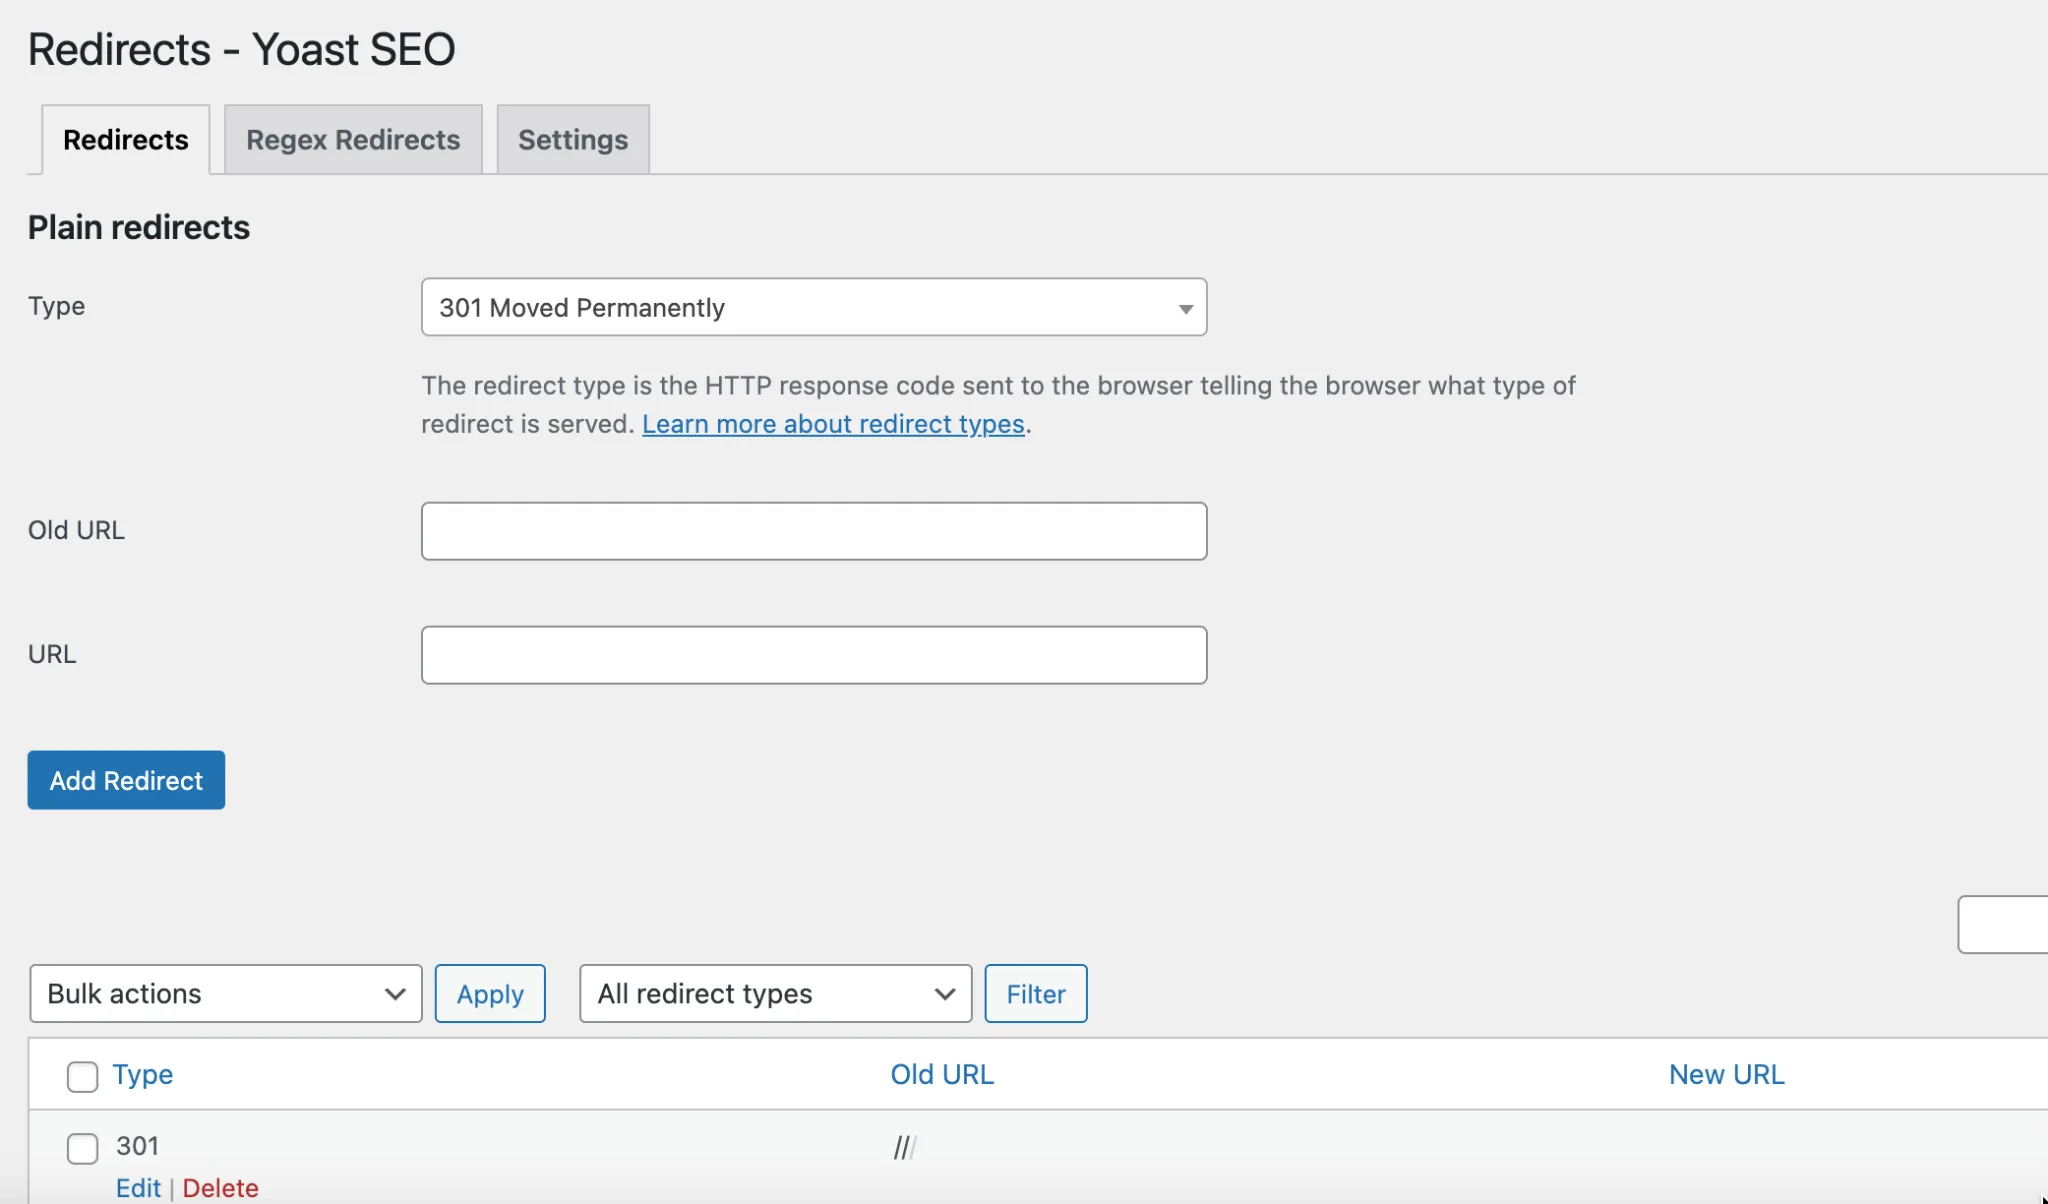
To configure a rule manually, open Yoast SEO > Redirects, select 301, and enter:
Old URL:
/business-website-tips-2024/

New URL:
https://example.com/business-website-guide/
Save the redirect after the new URL is accessible. Use the exact source path, including any directories.
Buying Premium does not replace verification. You are paying for management and automation features, not a guarantee that every destination you enter is correct.
Yoast SEO Premium Redirect Manager. Source: Yoast help documentation.
5. Change the slug in the WordPress editor
Once your redirect manager is ready, open the post or page you want to update.
Open the content editor and display the settings sidebar.
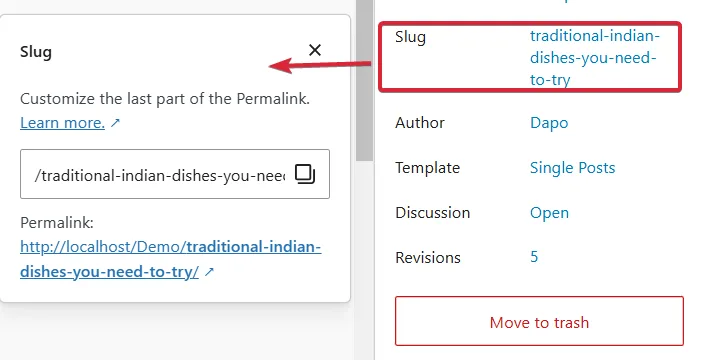
Find Slug and open its settings.
Replace the current slug with business-website-guide.
Save the change using the available save or update button.
After saving, copy the actual URL from the editor or public page. Do not rely solely on the address you planned in your initial notes.
If your WordPress permalink structure includes dates, categories, or additional directories, the final URL follows that structure. Set the redirect destination to the actual final address, not an assumed shorter version.
The Slug setting in the WordPress editor sidebar. Source: WordPress documentation (CC0).
6. Check the old and new URLs' HTTP responses
Opening the old URL and seeing the new page does not establish which redirect status was used. Inspect the HTTP response. MDN's documentation for HTTP 301 explains that the Location header identifies the redirect destination.
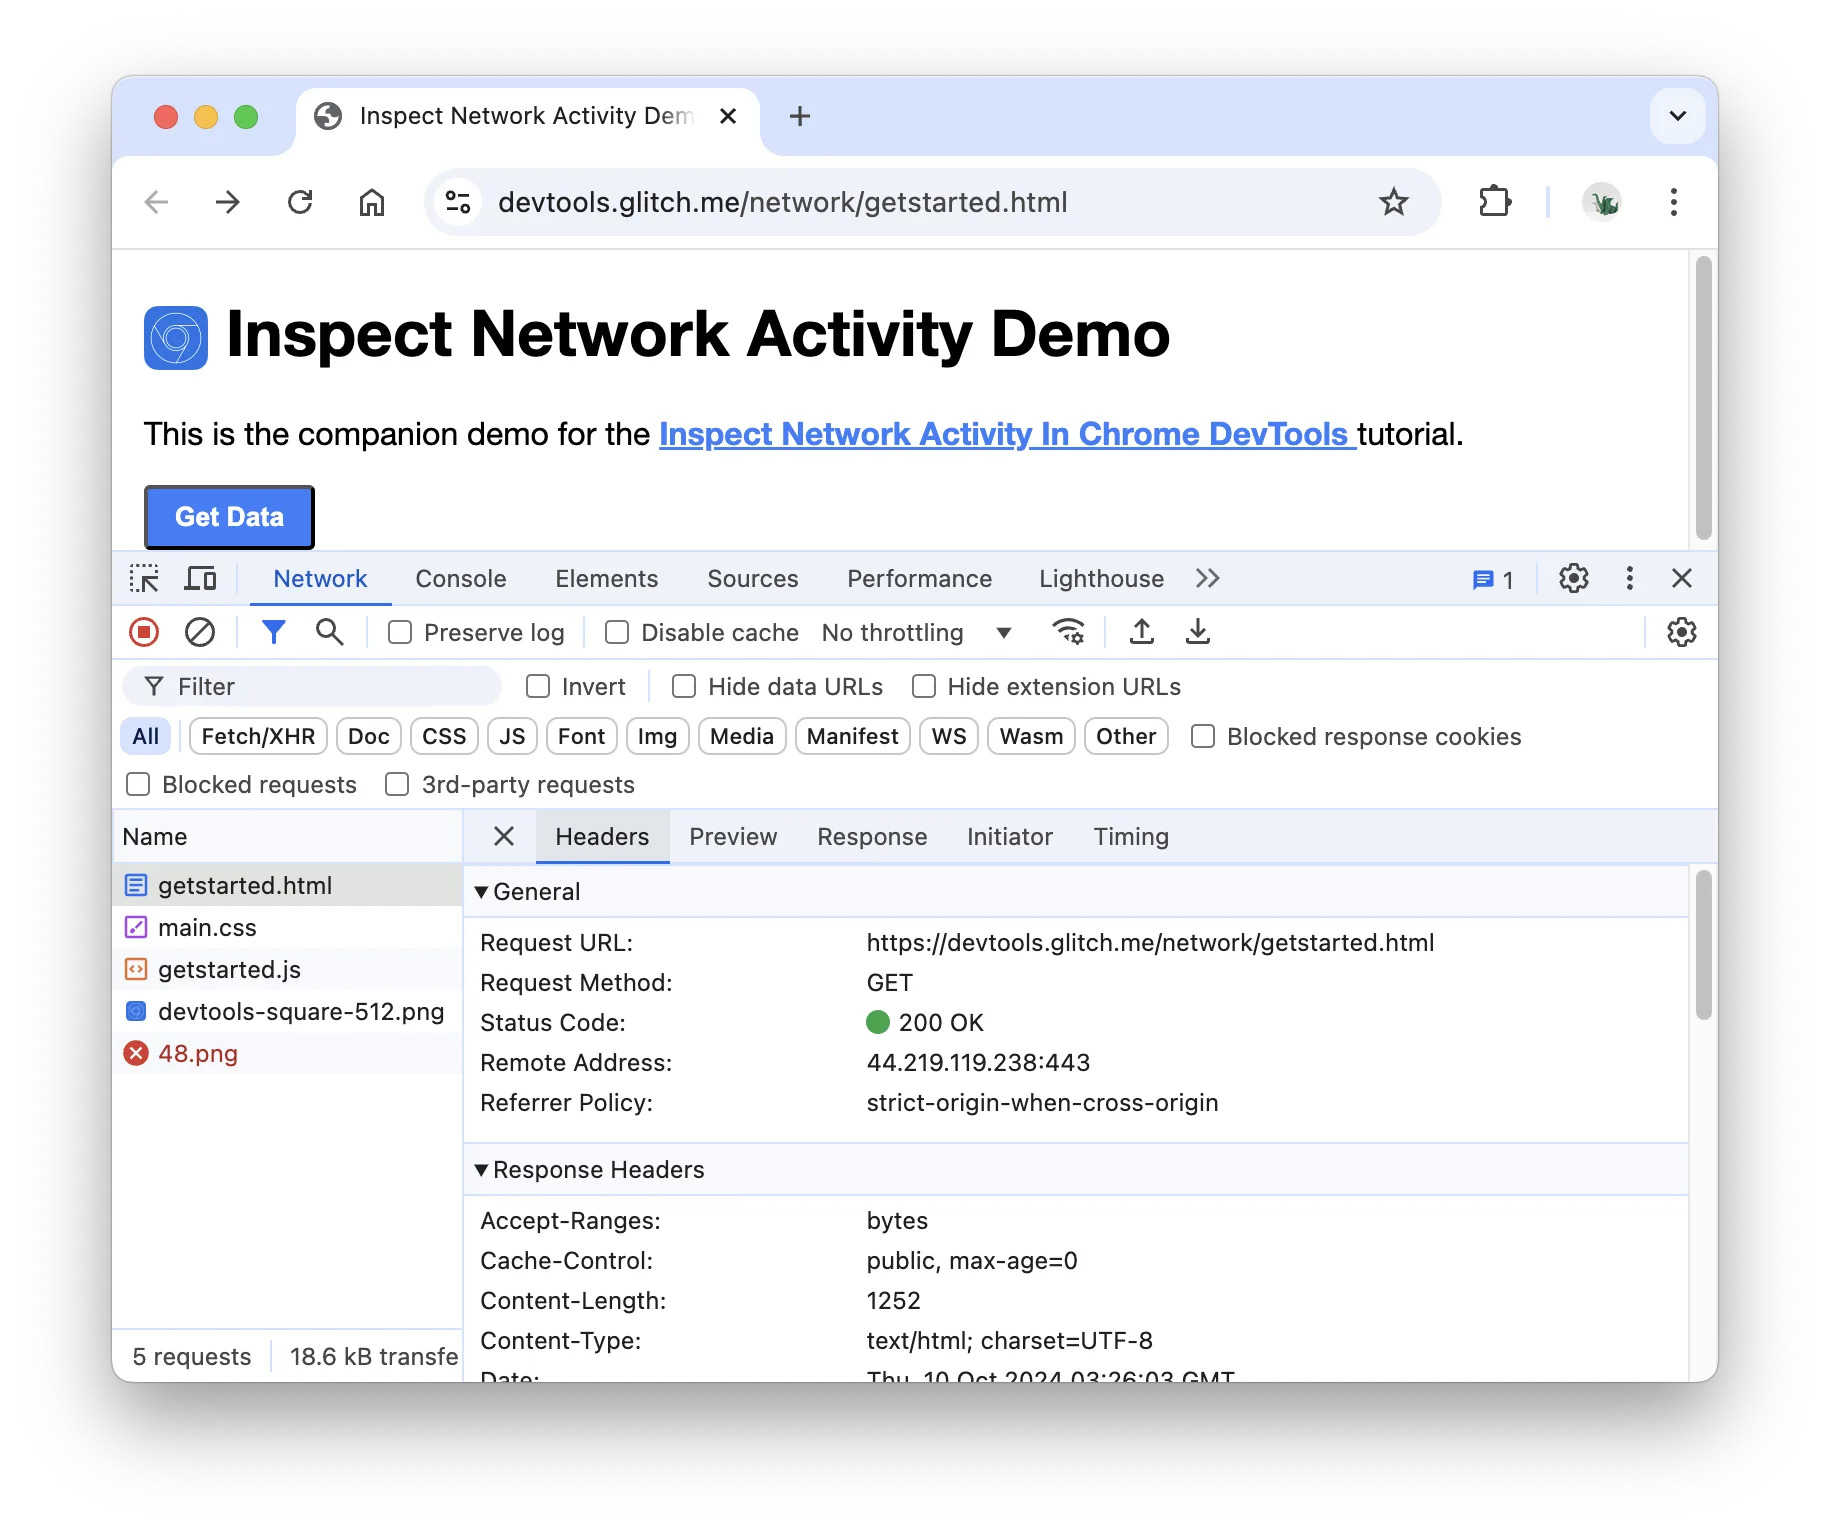
Open your browser's developer tools and select the Network panel. Enable Preserve log, then visit the old URL. Inspect the initial document request, its status, the Location header, and the subsequent request to the destination.
For a terminal check, the following examples use curl on Linux or macOS. Replace the example domain and paths with the URLs you are testing.
Inspect the old URL without following the redirect:
Check the destination's content as well. A 200 response is not enough if the wrong page appears.
Test
Expected result
Open the new URL directly
The correct content loads successfully.
Open the old URL
A 301 redirect takes you to the new URL.
Follow the complete redirect path
No loop or unnecessary intermediate destination.
Visit while logged out
Ordinary visitors receive the same intended result.
Use relevant query parameters
The redirect and parameter handling behave as required.
The Network panel and Headers tab in Chrome DevTools for checking HTTP responses. Source: Chrome for Developers (CC BY 4.0).
7. Update internal links, the canonical URL, and the sitemap
Redirects handle visitors who still use the previous address. For links you control, update them to point directly to the new URL.
Check navigation menus, buttons, links in other articles, breadcrumbs, and links on service pages. Do not deliberately leave internal links pointing to the old URL just because a redirect exists.
Google's canonicalization documentation recommends consistency between the preferred URL and internal links. Inspect the new page's canonical URL as well, particularly if a previous manual setting could still point to the old address.
If the new page is the preferred version of the content, its canonical tag would look like this:
Next, open the sitemap your website uses and confirm that the new URL appears as intended. Google's sitemap guidance recommends listing the URLs you want to treat as canonical. Do not assume every URL list has updated correctly without checking it.
8. Resolve redirect chains, loops, and caching issues
A redirect chain sends the old address through an intermediate address before it reaches the destination:
/old-slug/ -> /intermediate-slug/ -> /final-slug/
Simplify the rules so that both older addresses point directly to the final destination:
Google Search Central recommends redirecting directly to the final destination rather than creating unnecessary chains. Avoid redirecting many unrelated URLs to the homepage, since those redirects may be treated as soft 404s.
A loop is different: address A redirects to B, but B redirects back to A. Check every place that manages redirects, not just the plugin you most recently edited.
Symptom
First checks
The old URL still returns 404
Check the source path, rule status, and the exact requested URL.
The new URL returns 404
Check the saved slug, publication status, and permalink structure.
The browser reports too many redirects
Look for conflicting rules or rules that redirect back to one another.
The redirect leads to the wrong address
Check older rules, overly broad matches, and cached responses.
The request is absent from the plugin log
Check whether the server or a cache handles it before it reaches the plugin.
MDN's HTTP caching documentation explains that caching can occur at multiple layers. After fixing a rule, clear the caches relevant to the affected URL and test again. An incognito window does not clear your server or CDN cache.
9. Keep the redirect and plan a rollback without loops
Do not delete the redirect as soon as the new URL works. Google's site-move guidance recommends keeping redirects for as long as possible, generally at least one year. Keeping them longer can also help people who still follow older links.
Maintain a change log and review old URLs that continue receiving visits. Avoid removing rules simply because they are old.
If you need to reverse the change, do not immediately add a redirect in the opposite direction. An active old-to-new rule combined with a new-to-old rule creates a loop.
For a rollback, disable the conflicting rule, restore the intended slug, inspect any automatic redirect the plugin may create, and retest both addresses.
Are WordPress's built-in redirects enough?
For some post slug changes, WordPress stores the previous slug in _wp_old_slug metadata. The associated mechanism then attempts to locate the matching content and redirect the request.
However, the wp_old_slug_redirect() implementation has conditions and does not perform that lookup for hierarchical post types. Do not assume that ordinary posts, pages, category archives, and site-wide permalink changes all behave identically.
Rely on test results, not assumptions. If the old URL already returns a 301 redirect to the correct destination, do not add an identical rule without a reason. Use a redirect manager when you need explicit control, records, or handling for URLs that are not already covered.
Article FAQs
Short answers to common questions connected to this article.
Do I need a paid plugin to change a WordPress slug?
No. You can edit the slug with the built-in [WordPress editor settings](https://wordpress.org/documentation/article/page-post-settings-sidebar/), and [Redirection](https://wordpress.org/plugins/redirection/) provides free redirect management. Paid options are about additional features and workflow preferences, not a requirement for creating a 301 redirect.
Are redirects available in the free version of Rank Math?
Yes. Redirect management is available in the [free Rank Math plugin](https://wordpress.org/plugins/seo-by-rank-math/). Enable the Redirections module and select 301 for a permanent move. Check the relevant package if you need advanced features rather than a basic URL redirect.
Does free Yoast SEO automatically redirect a URL after a slug change?
The redirect manager covered in this guide is a [Yoast SEO Premium](https://wordpress.org/plugins/wordpress-seo/) feature. If an old URL redirects on a site running free Yoast SEO, the redirect may come from WordPress itself or another configuration rather than the Premium redirect manager.
Why does the old URL still redirect to the wrong address after I fix the rule?
Check browser, website, server, and CDN caches, then look for another rule handling the same URL. [MDN's HTTP caching documentation](https://developer.mozilla.org/en-US/docs/Web/HTTP/Guides/Caching) explains that responses can be stored at multiple layers. Inspect the HTTP headers to confirm the response you actually receive.
No. Use a genuinely relevant replacement page rather than sending every missing URL to the homepage. [Google Search Central](https://developers.google.com/search/docs/crawling-indexing/site-move-with-url-changes) warns that bulk redirects to an irrelevant destination may be treated as soft 404s.
Hi, I am Katon Fajar Utomo. A Web Developer & SEO Specialist dedicated to building high-performance modern websites, scalable internal systems, and technical search engine optimization.





Expert's summary
Change a WordPress slug with Redirection, Rank Math, or Yoast Premium, then verify redirects, internal links, canonical URLs, and your sitemap.
Katon Fajar
B2B tech partner